树莓派:修订间差异
无编辑摘要 |
无编辑摘要 |
||
| 第8行: | 第8行: | ||
<br> | <br> | ||
如果你拥有一个全新的树莓派,在安装Domoticz之前,你需要先为你的树莓派安装一个兼容的操作系统。<br> | 如果你拥有一个全新的树莓派,在安装Domoticz之前,你需要先为你的树莓派安装一个兼容的操作系统。<br> | ||
我们推荐Raspian Jessy | 我们推荐Raspian Jessy Lite,安装很简单,具体请查看[[全新树莓派的第一次设置]]。<br> | ||
<br> | <br> | ||
成功安装系统后,请继续进行以下操作。<br> | 成功安装系统后,请继续进行以下操作。<br> | ||
2017年8月4日 (五) 15:05的版本

介绍
树莓派是一款价格低廉、信用卡大小的微型电脑,可以用在多种项目中。它在我们的用户中是最受欢迎的板子之一。
要在树莓派中运行Domoticz,之前,我们提供了预置'Domoticz'的系统镜像可以直接写入SD卡。
现在,我们不再推荐这种方法了。
如果你拥有一个全新的树莓派,在安装Domoticz之前,你需要先为你的树莓派安装一个兼容的操作系统。
我们推荐Raspian Jessy Lite,安装很简单,具体请查看全新树莓派的第一次设置。
成功安装系统后,请继续进行以下操作。
向正在运行的树莓派中安装Domoticz
安装前提:
- 树莓派3B(树莓派1B(+)以及2B也支持)
- 最小4GB大小,class10级别的Micro-SD卡(第一代的Model B需要全尺寸SD卡)
- 带读卡器的电脑,用来将操作系统写入SD卡
- 显示器和HDMI连接线
- USB接口的键盘和鼠标
- micro USB接口的电源,电压5V (推荐提供2A电流,树莓派3推荐2.5A)
- 网线 (或者USB无线网卡) 用来连接到你的网络
(*) 显示器、HDMI线还有键盘跟鼠标都不是必须的,你可以通过电脑来远程控制树莓派,在路由器中找到树莓派的IP,然后说明里的'ifconfig'跳过就可以了。当然,你不能禁用SSH。
树莓派附加软件安装
成功安装Domoticz后,可以根据以下几个教程继续操作:
设置树莓派看门狗
监测Domoticz
在树莓派中安装PPTP-VPN服务器
为树莓派设置内存分区
监测内存使用
NAS监测
USB设备持久化
确远程访问安全
添加Tellstick支持
请至少执行USB设备持久化。
论坛里有很多新用户在重启后无法正常连接RFXCOM、Z-Wave等。
上面的教程可以避免这个问题。
树莓派相关硬件

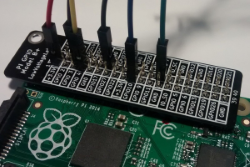
通用输入/输出(GPIO)
树莓派1A和1B拥有26针扩展接口
树莓派1A和1B、树莓派2B以及树莓派3B拥有40针扩展接口
Domoticz从1726版本开始支持标准GPIO。
Domoticz GPIO安装说明
到Domoticz论坛讨论树莓派GPIO
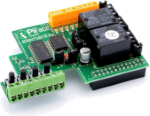
PiFace Digital

PiFace Digital is designed to plug on to the GPIO of your Raspberry Pi. With PiFace Digital you can detect the state of a switch, for example from a door sensor, a pressure pad or any number of other switch types. You can drive outputs to power motors, actuators, LEDs or anything you can imagine. PiFace Digital has eight digital inputs, eight open-collector outputs, eight LED indicators, two changeover relays and four switches.
The Piface Digital board is compatible with Raspberry Pi 2 Model B, Raspberry Pi Model B and A (26 pin connector)
The PiFace Digital 2 board is compatible with Raspberry Pi 2 Model B, Raspberry Pi Model B+ and A+ (40 pin connector)
Support for the PiFace Digital is available in Domoticz release 1045 and onwards.
Domoticz PiFace Digital installation instruction
PiFace Digital Domoticz forum thread
RaZberry Daughter Card

The RaZberry is a tiny daughter card that site on top of the Raspberry Pi GPIO connector not blocking the USB boards. It is powered by the Raspberry Pi board with 3.3V and communicates using TTL signals (RX/TX).
The daughter card hosts a Sigma Designs ZM5202 Z-Wave transceiver module (a so called 5th generation Z-Wave module; old RaZberry hardware was based on ZM3102 module - so called 3rd generation Z-Wave module), an external 32 K SPI flash for network data and a PCBA antenna. Additionally two LEDs are used to indicate certain status of the Z-Wave controller chip.
This board is compatible with Raspberry Pi 3, Raspberry Pi 2 Model B, Raspberry Pi B(+) and is supported by Domoticz.
NEW - Domoticz RaZberry installation instruction Raspberry Pi 3 in combination with OpenZwave.
OLD - Domoticz RaZberry installation instruction in combination with OpenZwave. Please note there is no active support on Domoticz in combination with the Z-way software.
Pi-mote
The Pi-mote control board is is a low cost and a simple wireless controller, dedicated to the Raspberry Pi computer, and Energenie ENER002 RF controlled mains sockets. It is an extremely simple, transmit only, open loop system controlled by six GPIO pins in "out" mode on the Raspberry Pi. It plugs directly into a Raspberry Pi computer, and is powered from the Pi.
Pi-Mote安装说明